(This post is part of my Frosty Festivities 2015 Blog Event – see a list of all the posts HERE)
These wood slice ornaments and gifts are so fun. I want to buy a bunch more slices so I can keep these all for myself, and make more for gifts! My favourite is the penguin keyring, which I’ve added to my bunch of keys already – no-one else is getting that!
Those are Little Miss’ hands in the photo above. The slices are about 5 – 6cm tall.
I don’t have a tutorial as such for these… because they were so easy there’s not much instruction needed!
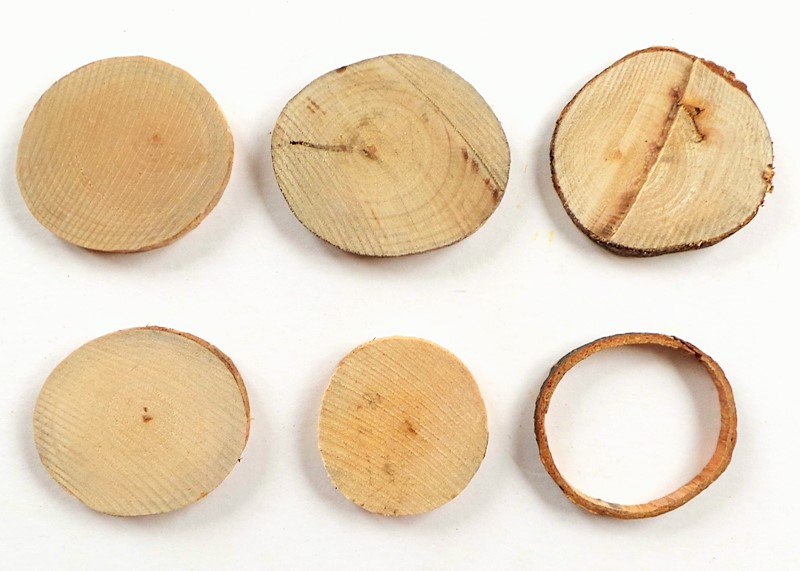
The slices I used were Amy Tangerine’s Finder’s Keepers Wood Slices. When these arrived I was a bit disappointed with them. They were a bit thicker than I thought they’d be (about 5mm deep – not that deep but a bit thicker than I’d like for scrapbook pages). They also just looked messy – mainly because a lot of bark had fallen off. But they were greatly improved when I decided to scrape off the remaining bark with a craft knife, so the edges looked clean.
In the below photo you can see 4 slices on the left which I had already removed the bark from before realising I should take a photo. The slice on the top right still has the bark attached but it hasn’t been well sliced – the surface is very uneven. On the bottom right you can see a piece of bark which came off in one neat ring, that’s how loose it was:
I decided that 2 of the slices would have magnets stuck on the back, and 2 would have holes through the top so they could be hung for display. So I set about trying to make a hole. Unfortunately hubby had taken his drill to work and I was too impatient to wait for him to get home. So I tried to make the hole with a nail and hammer:
As you can see this didn’t go too well, as I split the wood. At first it was just a tiny crack but when I tried to make the hole bigger (thinking I could cover up the crack later) it completely broke apart. But that did mean I had a piece to experiment with, and after trying to use a screw and a screwdriver (did not work at all) I discovered that I could make a good hole with an old paper piercer! It’s important that I say OLD paper piercer, you wouldn’t want to do this with your only one as it will blunt it. I have 2 paper piercers as I blunted one years ago, so I keep that for tougher materials like this. If you have a drill that will work best!
Once I’d figured out how to make the holes I just needed to decorate the slices. This was super easy.
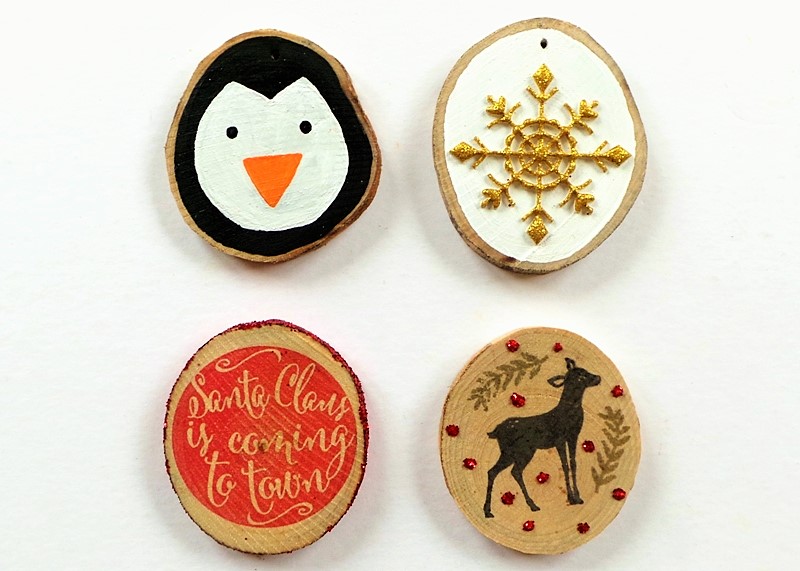
For the first one that would be a magnet I used the Hero Arts Lia Griffith ‘Deck The Halls’ stamp set to stamp a deer in black in the middle (with chalk ink), and two leaf garlands in gold around the deer. I did heat emboss all these, but I don’t think it made any difference so I wouldn’t bother next time! I also dotted some Mod Podge on so I could add some fine red glitter dots too:
For the next magnet slice I stamped a circular sentiment in the center (from Avery Elle ‘Joy To The World’, using Avery Elle’s ‘Cherry’ Pigment Ink), then added a thick layer of Mod Podge to the outer edge, tipping glitter on to it as I went:
For my two slices with holes I painted the centers – one white and one black, both with Martha Stewart Satin Craft Paint. Then I stuck a gold sticker (from My Mind’s Eye Christmas On Market Street) on the white slice, and painted a penguin face with white, orange, and more black paint on the black slice.
I chose to paint the majority of these slices because they had more imperfections in the wood, which is fine as I know wood is a natural element so it can’t be perfect, but I still didn’t want those showing on my finished items:
Here’s what they looked like all decorated. I did spray them with a layer of matt spray varnish as well – I’d certainly recommend varnishing one if it’s going to be a keyring:
Once the varnish was dry I tied twine through the one which would be a hanging decoration (I had to use a darning needle to get the twine through the hole), then I had a flash of inspiration and added a keyring to the penguin, and I glued magnets onto the back of the slices with no holes using superglue:
Then they were all done, ready to gift to someone for Christmas, or in my case, keep them all to myself!
Be Inspired:
Paint a penguin face on something round, or use a penguin embellishment or picture
Add stamping, glitter, or paint to something wooden (eg a wood box, frame, slice, or wood veneer shape)
Use the phrase ‘Santa Claus Is Coming To Town’ on your next project
I hope that’s given you a few ideas! Which wood slice do you like the most?
Remember that commenting on this post, and any post that goes live during November 2015, will count as another entry into the Grand Giveaway {NOW CLOSED}, but only if you’ve registered your interest in winning that prize right HERE!
I’ll be back again at 8am GMT tomorrow with the first sponsored giveaway!
Jennifer x


Super idea Jennifer!! Might have to go and cut a tree down!! LOL That is the biggest problem when you buy something on the net….not seeing/holding it!!! They can say the size but it doesn’t always register!! Well done on thinking outside the box!!
LikeLike
So incredibly talented and versatile!! Love these wood slices!! I love each one of them. Which one for a favourite…weeeell…. ugh… this is hard……. hmmmn…… I love the deer, and I love the snowflake… I really love the ‘santa claus is coming to town! Yes that’s my favourite… I’m humming that now!
LikeLike
These are awesome! I think wood slice ornaments/tags are going to be big this year as you’re the second person I’ve seen make them this week – and you’re both trend setters! I would love to try these! I need to find some wood slices! These all look amazing, but my favourites are the deer and the gold snowflake! Thanks for the wonderful inspiration!
LikeLike
What a clever idea. They are all cute, but the deer is my favorite.
LikeLike
Jennifer so enjoyed being part of your process with these projects. From start to finish there are always little glitches in crafting and yet you continue to embrace them and then create something improved or better. Thanks too for your feedback on the wood pieces as not every product is what you think it will be. Great projects and I especially like your little penguin.
LikeLike
wow they turned out really well…love the penguin…so cute!
LikeLike
These are very clever. They are all so sweet. I love the deer.
LikeLike
Very sweet idea for a little Christmas gift if you can bear to part with them! My fave has to be the penguin but I also love the snowflake. I wonder if you could screw those tiny eyelets in to the top as an alternative hanging method?
LikeLike
Maybe an electric drill for holes would be better. I like these Jennifer.All your designs are inspired and for some reason I’m thinking they look like cookies!
LikeLike
The snowflake, the snowflake! Even though we don’t have ’em here…..it’s so darn glittery and sparkerly [yes, I know I’ve spelled it wrong, but it fits better!!!] & you are so darn clever. Ashamed to say I threw out some of these cos they were so jolly thick….. figured I’d never use them. My bad [cringe]………
LikeLike
They are beautiful Jennifer, my children have drawn on wood slices before but I havent yet, shall have to change that 🙂
LikeLike
These are all awesome but my favorite is the one with the deer. It looks so nice and rustic with the wood slice.
LikeLike
What a great idea! These would look fabulous hanging on a tree..now if I can only find some wood slices! My favorites are the text based Santa Claus is coming to Town and the deer design.
LikeLike
Jennifer, can you tell me what type of stamp ink you used on the stamped ones? Did you use dye or pigment ink? I’ve never stamped on wood and don’t know which would give a better impression. Thanks!
LikeLike
Hello Karen! The ink I used was pigment ink for the ‘Santa Claus is coming to town’ and chalk ink for the reindeer magnet. I don’t think dye ink would work too well, as it’s not juicy enough to cover the bumpy surface of the wood. But I don’t think I’ve ever tried it so I’m not sure. I don’t own many dye inks as I don’t like using them much!
LikeLike
This is a fun idea! I really love all of the different ways you could use/give these as.
LikeLike
I saw these online and wondered what I’d do with them. This is a great idea,
LikeLike
My favourite is the deer…..love it.
LikeLike
these are adorable! very fun project! love the penguin!
LikeLike
Love the versatility. Both ornaments and a key chain. We get ornaments every year and this year I should make them!
LikeLike
These are so cute Jennifer. Wooden Christmas ornaments are my all time favourite and I adore the rustic nature of these ones.
Amy Tangerine did you say?
LikeLike
Awwww…really cute and sweet. Love the penguin!!!
❤ J
jwoolbright at gmail dot com
HerPeacefulGarden.blogspot.com
LikeLike
these are cute Jennifer x
LikeLike
Totally cute idea! The stamping came out really nice – a lot better than I expected! If putting a hole in was impossible for anyone, they could always glue a ribbon on either side at the top with a loop for hanging.
LikeLike
Love the penguin key-ring! I’d forgotten how much fun penguin motifs can be – not sure if I can put one (or three….) onto any projects I have in mind currently, but I will try to incorporate one into something Christmassy. Thanks for the inspiration!
LikeLike
The wood trend is a favorite of mine right now. I’ve never been too good to paint a picture but I think I could handle the penguin.
LikeLike
my fave is the penguin too!
LikeLike
my friend does those things like wood slices
LikeLike