About Me, Giveaways / Winners

Our Florida Holiday & A Crafty Giveaway – Edited To Add Winner

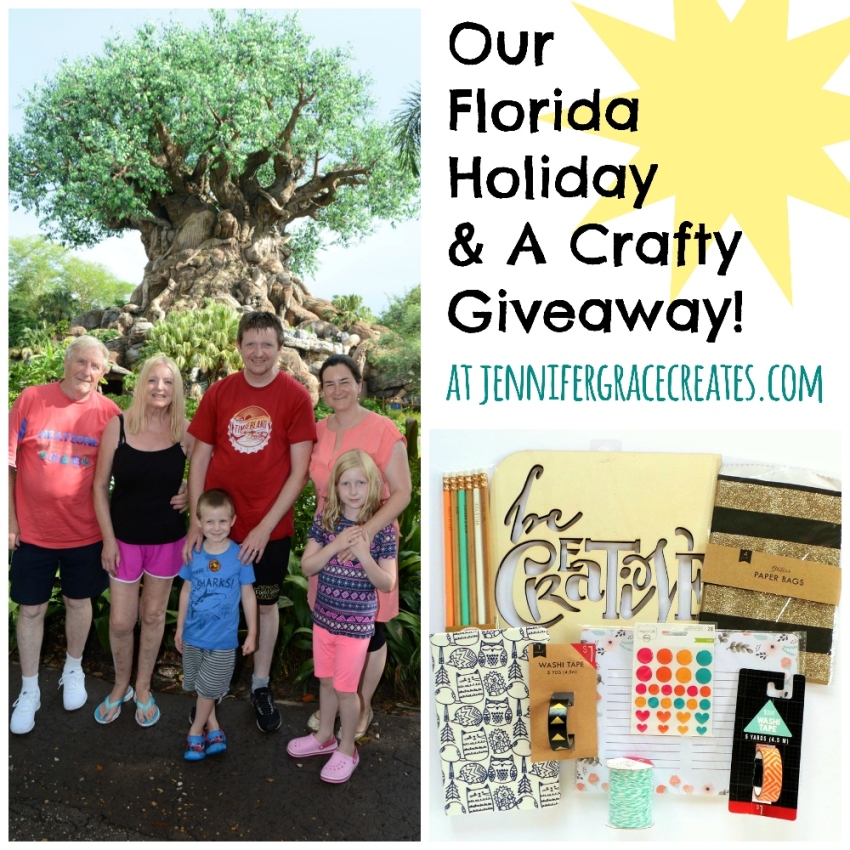
Hello. Today I want to tell you about the vacation we took to Florida during August, and I also have a crafty giveaway of some items I purchased in Target, Michaels, & Jo-Ann’s while I was there!

Our Florida Holiday & A Crafty Giveaway!

We are so lucky that my lovely in-laws asked us to go to Florida with them. They have visited the Summer Bay Resort many times and this year they asked us along to enjoy Orlando and the theme parks!

It wasn’t mine or hubby’s first times out there, as we’d both been before. But it was the kid’s first time. They had been to Disney Land in Paris, but Cheeky Boy was only 1 at the time so he doesn’t remember Paris at all. Little Miss had a couple of memories, like being scared on Big Thunder Mountain, but she was only 4 so again she couldn’t remember much.

They were both super excited about the holiday, and it certainly matched their expectations, and more! We had a wonderful time. And though it was baking hot – I mean really super hot for us English fragile beings (100 degrees F / 37.7 degrees C on some days) – we manage to stay cool a lot of the time by picking the right times to watch shows or sit in queues. Plus it rained on a few days, which cleared the air but didn’t last so long that it spoiled the day.

Here we all are on our way into the Animal Kingdom:

Our Florida Holiday & A Crafty Giveaway!

The kids loved the Safari ride here, which we went on twice and saw different animals both times. I enjoyed the Expedition Everest ride which was new for me, and hubby just about stomached it (he doesn’t like roller coasters that much).

One of the best things about Disneyworld is the little extras that kids can do for free – at Animal Kingdom it’s collecting stickers to become ‘Wilderness Explorers’ (you do a variety of things like play music, find out animal facts, and learn about other cultures), at Epcot it’s collecting stamps from each country on a Barney Bear picture (which you can also colour in on your way around), and at the Magic Kingdom there’s both the ‘Sorcerers of the Magic Kingdom Challenge’ (using picture cards to cast spells at magic portals throughout the park), and the ‘Pirates Adventure – Treasure of The Seven Seas’ (using a treasure map to find marked spots in Adventure land, where things come to life and the clues lead you to treasure at the end – you keep the map and the treasure card). These were all fun and we could have done lots more if we’d had longer – there were more Sorcery Cards and more Treasure Maps which we didn’t have time for. These extras are not advertised very much so make sure to look out for them if you go there.

My favourite place to go was Harry Potter World at Universal Studios. I have been dying to go here since it opened. My friend Rosie and I actually planned out our own Harry Potter World on a long bus journey once when we were at Uni together, then when the park opened years later we wondered if some Universal Studios bigwig must have been sitting behind us on the bus?!

Our Florida Holiday & A Crafty Giveaway!

I’d made shirts for us four to wear to Harry Potter World using my Cricut Explore and iron-on-vinyl. They say:

Mine – ‘I’m still waiting for my Hogwarts letter’

Hubby’s – ‘If you can read this my invisibility cloak isn’t working’

Little Miss’s – It’s leviOsa, not leviosA’

Cheeky Boy’s – ‘You must be a boggart because you look Riddikulus’

These were so fun to wear, all the cast members kept reading our shirts and laughing! The kids loved showing them off. I wished I’d made Disney ones too!

Harry Potter World lived up to my expectations, I loved the Hogwarts Express, the Escape from Gringotts, and the interactive wands especially. The ride in Hogwarts itself made me feel a bit sick though! I will do a post on Harry Potter World another day as I could say so much about it!

All in all, we had an amazing time. The kids will have so many fabulous memories…

Our Florida Holiday & A Crafty Giveaway!

And if they ever forget they can watch the movies I made. Thanks to Blogtacular and Xanthe Berkeley’s Video Workshop, I had learned the tricks to be able to record and edit daily videos using my iPhone and the Adobe Clip app. I saved videos that were 1 minute long, which I shared on Instagram and Facebook, and some that were longer (approx 5-8 minutes per day) which I am keeping for family memories. If you missed me sharing them on social media, you can watch the 1 minute long videos stitched together as one video (less than 15 minutes long) here:

Or click HERE to view in YouTube.I also enjoyed visits to Target, Michael’s, and Jo-Ann’s for buying some crafty supplies. I bought lots of bits and pieces, including a Marquee Love letter J, a D-Ring 12×12 album, some paper, material, paints, and more! I was in heaven.I wanted to spread the joy, so I bought some items for a giveaway for you!Here’s the items you could win:

Our Florida Holiday & A Crafty Giveaway!

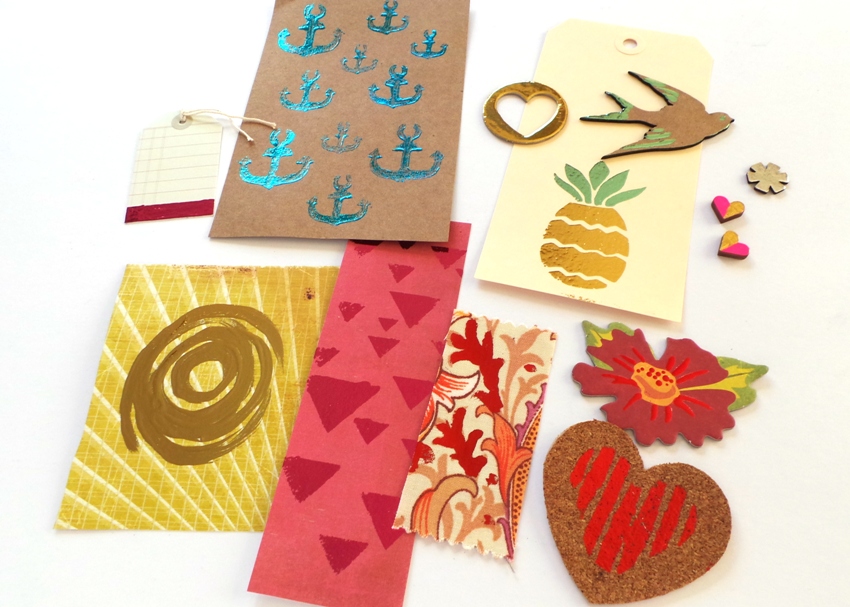
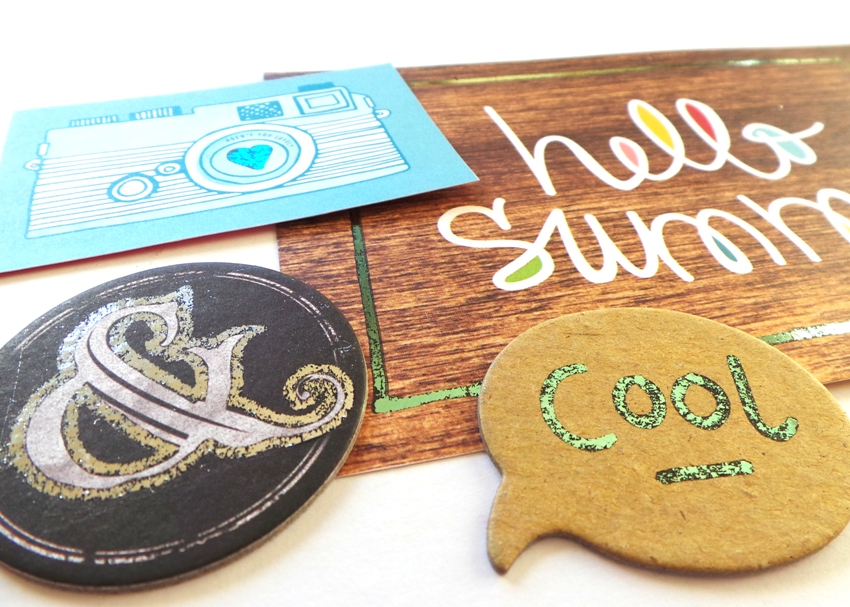
Including some pencils, washi tape, twine, enamel dots, a ‘be creative’ wood plaque, and a cute little notebook – here’s a peek at the pages inside:

Our Florida Holiday & A Crafty Giveaway!

Aren’t they fun?!

To enter to win this giveaway just leave a comment at least 8 words long on this post. For additional entries you can also comment on either of last week’s posts – ‘Minc Reactive Paint & Toner Pen’ or ‘Kickstarter Campaign For Jennifer Grace Creates’. So you can earn up to 3 entries.

Minc Reactive Paint and Toner Pen Test               Jennifer Grace Creates Mugs Kickstarter Campaign

This giveaway is open internationally and it will close for entries on Thursday the 20th of October at 10pm GMT. The winner will be drawn from all entries using random.org, and I’ll post the winner on a blog post at some point that weekend (21st – 24th Oct).

The Giveaway is now closed – the winner was KT Fit Kitty! Thank you to all who entered!

If you have any questions or are having problems commenting please contact me at jennifergrace(at)hotmail(dot)co(dot)uk

Thanks for stopping by!

Jennifer x

About Me

Kickstarter Campaign For Jennifer Grace Creates Mugs!

If you’ve recently seen my Facebook or Instagram feed you’ve probably already seen this, but if not here you go! I am currently running a Kickstarter campaign, to try and raise funds to buy a mug press and sublimation printer, so I can produce mugs with my designs to sell in my Jennifer Grace Creates Etsy Shop

Jennifer Grace Creates Mugs Kickstarter Campaign

I ordered a few mugs with my designs on a while back, but when they arrived a lot of them had problems – chips in the mugs or errors in the printing. This got me thinking that if I wanted to make more mugs I’d like to be able to do it myself, as I’m a perfectionist and would like to have complete control over the item from start to finish! I could try other companies that produce mugs, but most of the time you have to order lots of one design, and I want to produce lots of designs. I also want to be able to make personalised mugs, so if someone wants their name on a mug, for example, I’ll be able to make it straight away!

Here’s the mug I’d most like to be able to make for myself:

I Like To Sniff Pretty Paper Mug - Jennifer Grace Creates

I love coming up with quirky designs, and having my own mug press would make it easy to produce mugs that work for all kinds of people (or mermaids):

Steampunk Mermaid Mug - Jennifer Grace Creates

I’d like to make some funny ones too…

Careful I'm Secretly An Evil Genius Mug - Jennifer Grace Creates

I designed this one recently because I live by the ‘Jurassic Coast’ in England, so dinosaurs are a regular topic around here:

I'm A Tea Rex Mug - Jennifer Grace Creates

There’s lots more designs which you can see over on my Kickstarter Campaign. If you could take a look and consider pledging I’d be most grateful! If you aren’t aware of Kickstarter then I should say that most pledges are like you are pre-ordering an item. You pledge for which item you’d like, e.g. one mug, then if the campaign is successfully funded I will send out a survey afterwards asking which design or designs you wanted. Then I’ll buy the mug press and printer, along with lots of blank mugs, and if all goes well you’ll receive your chosen pledge sometime in December 2016. So it’s not like you are donating money for nothing (unless you choose to pledge only £1). Free UK shipping is included in the pledge amounts too.

If you have any questions about it do let me know! If you are unable to pledge at the moment but do like the look of my mugs I’d love to hear in the comments below which of the mugs you like or what designs you’d like to see in the future. I will definitely do a mug giveaway at Christmas too, as long as I’ve been able to buy the tools and supplies.

I will be back tomorrow with a giveaway of items I bought in Florida!

Jennifer x

Scrapbook Layouts

The Minc Reactive Paint and Toner Pen!

Hello!

Another post at last! Sorry it’s been a long time. Have you missed me? I *think* I actually have a post to go live every day this week (Monday – Friday) so that will be exciting, huh?! One of them will be a giveaway post!

I have been busy since my last post, with a family holiday to Florida (which you already know about if you follow me on Instagram), then getting back into the school runs, my Parent Teacher Association Chairwoman post, running Rainbows, back to work at the school library, and I’ve had a steady stream of Etsy orders (thank you if any were from you!). So it’s no wonder I’ve struggled to fit in time for blog posts!

Today I’m sharing some tests I conducted with the Heidi Swapp Minc Reactive Paint and Toner Pen…

Minc Reactive Paint and Toner Pen Test

First I sorted out the items I wanted to try painting on – a mix of patterned and plain paper, a cork sticker, various chipboard embellishments, and some wood veneer shapes. I also grabbed a few Happy Scatter stencils to use on some of them:

Testing The Heidi Swapp Minc Reactive Paint and Minc Toner Pen

I squeezed some paint out onto a craft mat, and used a sponge dauber for some and a paintbrush for others. The sponge dauber gave a bubbly effect when applying it but this evened-out as it dried so it didn’t effect the final foiling:

Testing The Heidi Swapp Minc Reactive Paint and Minc Toner Pen

Make sure you clean the craft mat, sponge dauber, paintbrush, and stencils (or whatever you are using with the paint) straight away after using, as it’s quite a gluey, sticky paint – I wouldn’t want it to dry on my tools!

I used the stencils on a few and painted freehand on the rest. I made sure the paint layer was even, not patchy – this was easy to achieve as the paint itself is thick and doesn’t spread out too much. I did have to hold some of the pieces up at angles to the light, so that I could check there were not any patchy areas, if there were I painted them again. Then I left it all to dry overnight, as the paint has to be super dry before you try foiling it:

Minc Reactive Paint

They mostly foiled very nicely, but I did hit a few unexpected snags which you can avoid! I didn’t think about the plastic or adhesive on the back of the stickers and chipboards and how that would melt in the Minc. Here’s where the flower chipboard backing melted and stuck to the carrier sheet:

Testing The Heidi Swapp Minc Reactive Paint and Minc Toner Pen

I managed to scrape it all off after it had cooled, but you might want to remove the backing off chipboards where possible! Or perhaps put a sheet of paper in the carrier sheet under the chipboard or sticker, so if it melts it sticks to the paper instead of your carrier sheet.

Another problem I had was with these wood veneer hearts. They were the thickest item I was trying to put through, at 3mm deep – the other items were 1.5mm deep at most. And these hearts did not fit through the Minc. I gave it a go because I knew I could hit the reverse button if they got stuck. They got close enough to be warmed up a bit, so the foil melted on them a little, but then I had to reverse it as they wouldn’t actually go in:

Testing The Heidi Swapp Minc Reactive Paint and Minc Toner Pen

I tried to think of other ways to melt the foil on, so I tried putting them in a carrier sheet and using a heat tool to warm it, but this crumpled my carrier sheet:

Testing The Heidi Swapp Minc Reactive Paint and Minc Toner Pen

And there wasn’t much more foil stuck on than before:

Testing The Heidi Swapp Minc Reactive Paint and Minc Toner Pen

I did managed to flatten my carrier sheet out a bit by passing it through the Minc a couple of times, but it’s still a bit wobbly!

Finally I tried adding more paint, letting it dry again, and adding foil just using a heat tool – with a metal paper piercer to help me hold the foil in place while I heated it up. This was the most successful coverage-wise, but it did go bubbly – I’m not sure if the paint wasn’t quite dry, or if it was because of all the layers, or if it was the heat tool that caused the bubbling! Never mind, I shall keep experimenting:

Testing The Heidi Swapp Minc Reactive Paint and Minc Toner Pen

Here’s all the items that I used the Minc Reactive Paint on, including a scrap of fabric. The fabric worked fine but I should have put a sheet of paper under that in the carrier sheet too, as some of the paint melted through the fabric fibres! I was impressed with how these all turned out though:

Minc Reactive Paint

Especially the gold ones! I love the gold pineapple using my Happy Scatter Pineapple Mini Stencil:

Foiled Embellishments Using The Heidi Swapp Minc Reactive Paint

Now, on the other hand, the Toner Pen was shockingly bad. Here’s all the items I drew with the pen:

Testing The Heidi Swapp Minc Reactive Paint and Minc Toner Pen

I made sure I drew slowly, and I used a mix of shiny and matt papers – the ‘make it happen’ quote was on super glossy paper. The ink coverage looked great on them all. But they foiled terribly:

Testing The Heidi Swapp Minc Reactive Paint and Minc Toner Pen

The foil worked in some places so I guess it would be okay for a grungy foiled look, if such a thing exists?! But it wasn’t the look I was going for:

Using The Heidi Swapp Minc Tone Pen

I don’t think I shall be using the Minc Toner Pen again. I shall definitely be using the paint again though, I couldn’t wait to use some of my painted items so I pulled out a photo and put this page together:

Pile Of Pressies Scrapbook Page Using Heidi Swapp Minc and Minc Reactive Paint

The foiled items are a great way to make the page extra special and shiny:

Pile Of Pressies Scrapbook Page Using Heidi Swapp Minc and Minc Reactive Paint

I’m going to see what else I can paint and foil now…

I hope you are all having a great Monday!

Jennifer x