
Last week was a half-term holiday, and my 6 year old daughter had one piece of homework… to make a model of a Victorian invention. I googled a list of inventions and she chose to make a telephone…

We went for the ‘candlestick’ style telephone, as the earlier telephones were a bit box-like, and the candlestick style was introduced in Victorian times too, so that was okay. Plus it could be made from a pile of junk – this is what we started with though I added a few bits during the project:

You can also see here a sheet of images which I printed, just pictures I found on google to help us visualise the project!
First she drew around the cardboard tube (from inside a kitchen roll) onto the top of a plastic bowl (which was turned upside down):

I cut the hole for the tube to go through, as the plastic was a bit sharp-edged when cut.
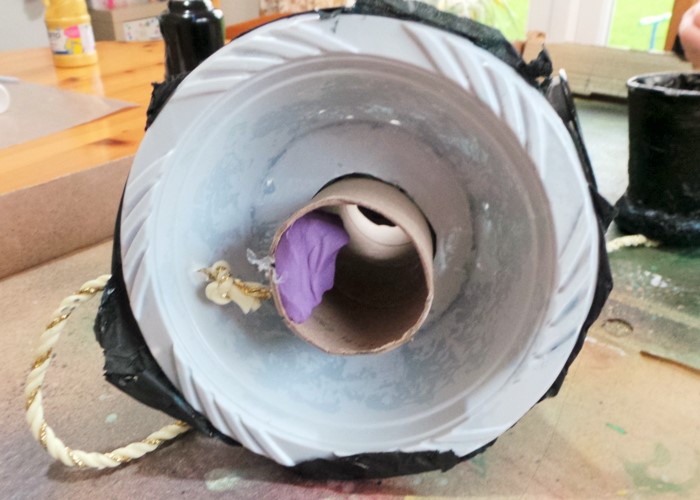
Then Little Miss drew a mark of the tube at the height she thought the cradle for the earpiece should go, and I cut a slit in it with a craft knife:

She pushed the cardboard tube inside the bowl, and taped it into place. Then she blu-tacked a plastic lid to the top of the cardboard tube:

I suggested we moved the lid down a bit so we could angle it a bit more, like the telephones in the pictures. So she did that and taped it into place. I did end up tucking a bit of kitchen paper scrunched into a ball underneath the blu-tack as well, as the plastic lid kept tipping down, but I don’t have a photo of that bit:

She cut the end off a paper cup to make it shorter, and then added some tape so we could attach it to the plastic lid at the top of the cardboard tube:

I made the cradle for the earpiece to sit on, by cutting an old hanger with wire cutters (be careful if you do this, protect your eyes and do it away from children in case sharp bits of wire ping off), and taping it to two shortened bits of kebab stick, one stick above and one stick below the hanger piece – for strength:

I’m not sure it was the best way to make the cradle but I couldn’t think of anything else!
We then pushed the kebab sticks through the slit in the cardboard tube, and added a big blob of plasticine to the ends of the sticks inside the tube. This acts as a weight so when the earpiece is lifted the cradle tips up – which would attract the attention of the telephone operator when you wanted to make a call! When the earpiece is put back it goes down again:

We took another paper cup for the earpiece, and Little Miss pierced a hole in the base with a pencil:

And we attached string as the cable between the earpiece and the phone (I pierced the hole in the bowl). I scrunched up some kitchen paper and Little Miss taped it to the top of the ‘earpiece’ – so that it wouldn’t slide straight through the cradle:

Now it was on to the fun part – decorating! I ripped up lots and lots and lots of tissue paper, and she used PVA glue to stick it over most of the telephone. I explained about overlapping the tissue paper and adding PVA glue to the top layer too so it looked smooth:

She did most of this but I did finish off at the end, doing a couple of the harder to reach corners and smoothing it over a bit more:

We’d left the paper cups because we figured we could paint them, but if I did this again I’d tissue paper all of it. The paper cups had a slight satiny effect which meant the paint didn’t stay on that well so we had to do a few layers:

When the decorating was nearly done I added a lump of plasticine at the bottom of the cardboard tube, towards the back of the phone, to stop it tipping forwards:
Then for good measure and to make it feel more realistic and heavy, I made a base for the phone, by getting Little Miss to tape some pebbles onto a circle of card the same size as the bowl, leaving a space for the tube in the centre, and space round the edge for the rim of the bowl:

This was then taped to the underneath of the phone, and we tissue-papered over the tape. Our phone was now nice and sturdy:

But it was too boringly black, so my daughter used a sponge dipped in gold paint to rub all over the phone, to give it a more brass / antique look:

I showed her how it was better to only add the gold paint in a thin layer, so the black still showed through, and she got the hang of that quickly. I did finish off the hard to reach places again though!
Then it was finished and all ready to make a call! Here it is with the earpiece on and off the cradle:

She also had to fill out a fact sheet which will be displayed with the model:

Even though this was quite a big project, as it took several day what with waiting for glue and paint to dry between layers, we both enjoyed the process. She’s learnt a few arty techniques, and I’ve found another reason for all the crafting supplies in my house! Bring on the next crafty homework… but not the maths. I don’t like maths!
Have a great day,
Jennifer x

Looks like you both had great fun with it.
LikeLike
Well then, alongside the end result, I’m impressed by 3 main things here: [1] that she painted all that without poking her tongue out in concentration … I catch myself doing that when I’m focussing sometimes! 😉 [2.] that she managed it all in a white shirt!! I wouldn’t dare [she’s clearly a very professional and mature crafter already!] and [3.] her lovely handwriting!
Job well done Little Miss! [OK, and you too Big Miss!] x
LikeLike
Wow! This is such a clever craft! I love it! I am very impressed with the outcome! Look great! #pintorials
LikeLike
Julie’s comment made me smile. I always cringe when they come home with project homework….yet they love it and Little Miss has done a superb job!! x
LikeLike
Brilliant job! Looks like you had lots of fun with it too – Little Miss clearly takes after her Mum! :o)xxx
LikeLike
Wow – that looks amazing 🙂
LikeLike
I think this is a great project for my daughter. She’s going to do Alexander Graham Bell the creator of the telephone in the science fair next week. Thanks for the great idea it looks like a lot of fun.
LikeLike